How to Make No-Bake Chocolate Biscuit Bars
Step 1: Prepare the Biscuits
ADVERTISEMENT
Break the biscuits into small, uneven chunks by hand.
Avoid crushing them into fine crumbs—the larger pieces create the signature crunchy texture that makes this dessert so enjoyable.
Transfer the biscuit pieces to a large mixing bowl.
ADVERTISEMENT
Step 2: Make the Chocolate Mixture
Place the chopped chocolate and butter in a saucepan over low heat.
Stir continuously until the mixture becomes smooth and fully melted.
Add:
- Cocoa powder
- Sweetened condensed milk
- Vanilla extract
Continue stirring until the mixture becomes glossy, thick, and well combined.
Step 3: Mix Everything Together
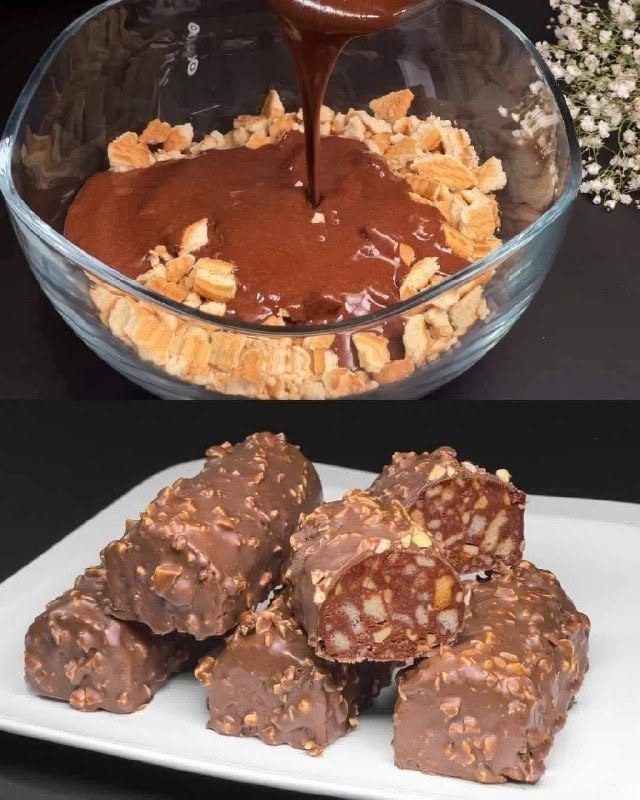
Pour the warm chocolate mixture over the broken biscuits.
If using nuts, add them now.
Gently fold everything together until every biscuit piece is evenly coated with the rich chocolate mixture.
Step 4: Shape the Dessert
Choose one of the following methods.
Option 1: Chocolate Biscuit Log
Transfer the mixture onto a sheet of parchment paper.
Shape it into a compact log using your hands or a spatula.
Wrap tightly in parchment or plastic wrap and refrigerate for 2 to 3 hours, or until firm.
Option 2: Chocolate Biscuit Tray
Press the mixture firmly into a parchment-lined square or rectangular baking pan.
Smooth the surface with the back of a spoon or spatula.
Refrigerate for about 2 hours, until completely set.
Step 5: Prepare the Chocolate Coating
Melt the milk chocolate together with the vegetable oil or butter over low heat or in short microwave intervals.
Stir until completely smooth.
Fold in the crushed peanuts or chopped nuts.
The oil helps create a glossy finish while making the coating easier to work with.
Step 6: Coat and Chill
Once the biscuit mixture is fully chilled:
- Cut it into bars, squares, or slices.
- Dip each piece into the melted chocolate coating.
- Allow excess chocolate to drip off.
- Place the coated bars on parchment paper.
Refrigerate for 30 to 45 minutes, or until the chocolate coating is firm.
Expert Tips
For the best results:
- Use good-quality chocolate for a richer flavor.
- Don’t over-crush the biscuits—large chunks provide the best texture.
- Chill thoroughly before cutting to prevent crumbling.
- Let the chocolate coating cool slightly before dipping to create a smoother finish.
- Store the bars in a single layer until the coating has fully hardened.
Delicious Variations
This easy dessert can be customized in many ways.
Try adding:
- Toasted almonds
- Walnuts
- Pecans
- Shredded coconut
- Chopped dates
- Raisins
- Dried cranberries
- Mini marshmallows
- Caramel pieces
- Chocolate chips
For extra flavor, add a pinch of cinnamon or a small amount of instant espresso powder to the chocolate mixture.
Storage Instructions
Refrigerator: Store the bars in an airtight container for up to 7 days.
Freezer: Freeze for up to 3 months. Place parchment paper between layers to prevent sticking.
Allow frozen bars to thaw in the refrigerator before serving.
Frequently Asked Questions
Can I use milk chocolate instead of dark chocolate?
Yes. Milk chocolate creates a sweeter dessert, while dark chocolate offers a richer, more intense cocoa flavor.
Which biscuits work best?
Tea biscuits, Petit Beurre biscuits, digestive biscuits, or Marie biscuits all work well.
Can I make this recipe ahead of time?
Absolutely. These chocolate biscuit bars are ideal for preparing one or two days before serving.
Can I skip the nuts?
Yes. Simply leave them out if you have allergies or prefer a nut-free version.
Final Thoughts
These No-Bake Chocolate Biscuit Bars are the perfect combination of rich chocolate, buttery flavor, and crunchy biscuit pieces. With no oven required and only a handful of everyday ingredients, they’re an excellent dessert for beginners and experienced home bakers alike.
Whether you’re making them for a holiday gathering, afternoon tea, birthday celebration, or simply to satisfy a chocolate craving, this easy recipe delivers delicious results every time. Once chilled and coated in smooth chocolate, each bite offers the perfect balance of creamy, crunchy, and indulgent flavors that everyone will love.
ADVERTISEMENT